Category: networking


While it may seem pointless at first I actually have a halfway legitimate reason for going through the effort.  First off, of course, I wanted to see if it could be done and how usable it would be.  Second, I was sick of taking the compact flash card out of my Libretto 50ct and sticking it in my Mac to put new files on the system.  I figured it would be easier to punch up a URL and download the file directly.

Now that the “why” is out of the way, now we need to cover the “what”.  What you need is a wireless card that has MS-DOS drivers available for it.  There are a couple but for me, the easiest to find was an Orinoco Silver/Gold card.  Part of the reason I went with this card is that it is NOT cardbus.  It’s a 16-bit pcmcia card so it works in my Libretto 50ct.  The Orinoco card uses an Agere chipset so in theory this may work for other similar cards.  Once you’ve obtained your card, you will need the driver which is available on this server.  That little zip file on there contains everything you need.

Now for the how…  The first part can be a bit interesting.  After you’ve stuck your card into the laptop and unzipped the file, you are pretty much interested in two directories from the zip file.  First you’ll need to deal with what is in the CAD directory.  Read the readme.txt first and you will find out that you need to run MSD(Microsoft Diagnostics) and find a free location in memory to use as a base address.  In the readme, the suggest using:

/m=d000

However this didn’t work for me.  I found another location that was suitable and inserted a line similar to this one into my config.sys:

DEVICEHIGH=C:\DRIVERS\CAD\WVLANCAD.SYS /i=10 /b=1300 /m=b400

That is what worked for me, your mileage may vary.  Reboot your computer and see if that works.  By working, I mean not getting an error.  After that is done, you’ll need to deal with the files in the PACKET directory.  First you’ll want to edit the PACKET.INI file.  This may disappoint some of you here but you only have two options which are open or WEP.  Hopefully you have a WEP router that is off in the corner of your network where it cannot hurt anyone.  In the packet.ini file, you’ll want to set the following lines most likely:

Wireless_Network_Name = ANY (put in your ssid)

Station_Name = John Does Notebook PC (obvious)

;Enable_Encryption = N (uncomment and change to “Y”)

;Key1 = abcde (uncomment and put in your key.  Use “0x prefix for hex)

After these things are done and the file is saved, you can try out your settings with:

wvlan42 /L

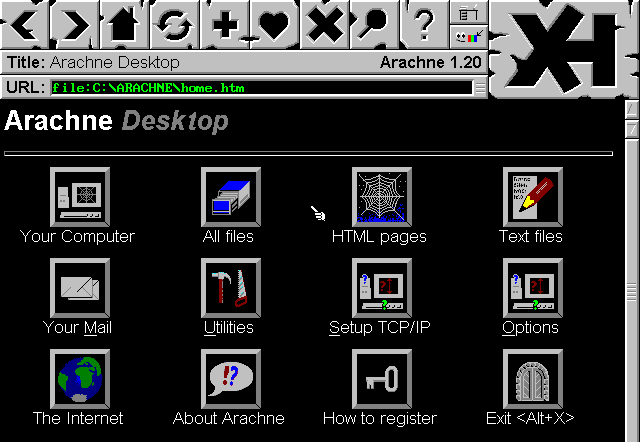
This should finally turn the light on your card on.  This means everything is probably working but it’s pretty hard to say at the moment because you don’t have ping or anything installed by default with MS-DOS.  Feel free to add that line to your autoexec.bat if you don’t want to have to worry about it in the future.  Now it’s time to download Arachne which is a fully graphical web browser for MS-DOS.  It’s the best one that I tested and the only one I could get to work.  Once you start up Arachne, you’ll need to set up some network settings.  The drivers above handle your layer 1 and layer 2 functions.  Arachne will pretty much handle the rest itself.  When I configured Arachne, I chose “Resident packet driver” and “bootp/dhcp”.  After that, you need to either restart or hit the “use new settings button.  If all goes well, you should be surfing like it’s 1999 all on your MS-DOS based laptop.

My new $43 network

I’ve been working on a lot of virused computers lately.  Typically I haven’t had much concern for other devices on my network but then I ran into a recent rash of viruses that are much more sophisticated than usual.  One of them was silently doing “click fraud” in the background at the rate of 1000 clicks per minute or so.  This got me a little spooked about the rest of my network.  Even though my main computers are macs, I do think that cross platform or mac viruses will become a more regular occurrence.  This is why I decided to rebuild my network.

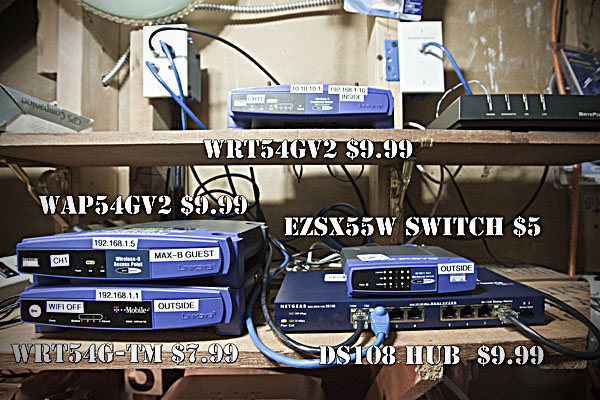
I have been hitting a lot of thrift stores lately.  It’s unbelievable what people are throwing out in my area.  Some stuff I can understand like the network hub for instance but other stuff like the wrt54g’s are a bit of a surprise.  The routers I have found range from WRT54Gv1’s to WRT54G-TM’s and routers as new as WRT54Gv6’s.  The prices have been as low as $7 up to about $13.  Sometimes I get the power supply with them, other times I pick up extras somewhere else.

In the matter of 2-3 months or so, I’ve managed to snag about 10 of them at bargain basement prices.  Personally, I don’t see the need for 802.11N for everything.  If I want to go REALLY fast, I’ll just plug in a wire, that’s always going to be faster than wireless anyways.  Whatever the case, their loss is my gain.  I’ve flashed these routers with DD-WRT for now since I don’t have a good grasp on OpenWrt quite yet and don’t need the extra functionality for the moment but I plan to start experimenting with OpenWrt a bit more at a later date.

Here’s how my network is laid out now:

DSL MODEM
^
OUTSIDE ROUTER(WIFI DISABLED)
^
HUB  <–>  Network sniffer
^
SWITCH  <–>  Guest access point(802.11B, WEP devices) & virused systems
^
INSIDE ROUTER(WPA enabled) <–> Most protected systems

I had a couple of goals with this layout.  First, I wanted to provide a single point where I could sniff ALL traffic going in or out of my network.  The hub provides me this because all of the traffic is spewed across all of the ports.  When I only have 2 devices plugged into the hub, there should not be a performance hit from this. One caveat however is a switch labeled as a hub.  I was unfortunate to purchase such a device but at least it was only a few bucks.  Another challenge is actually finding a 10/100 hub.  Most of them on the used market seem to be 10mbit.

My next goal was having a place to isolate guests and hook up older, insecure devices that only work with WEP and/or 802.11B.  One of my next steps will be adding another dedicated guest router for 802.11G devices but that’s not a huge priority.  Most importantly, I wanted to segment virused PC’s off of my network.

Hopefully this new setup will allow me to research odd malware behavior and keep my good systems a bit safer in the process.

Computer world recently published an article about some MIT researchers promising internet 100x faster and cheaper.  This always SOUNDS good when such promises are tossed around but it seems a little short-sited overall.  Generally a drastic change like this will cost a LOT of money re-outfitting all the NOCs, colos and other internet hubs with new routers and hardlines.  I imagine the end user will end up paying for it one way or the other.  Sensational promises remind me of things like memjet and transmeta that never quite seemed to live up to the hype …  (Still waiting on memjet)

This article says nothing about is getting fiber to the curb though.  Oddly, Verizon just laid a bunch of fios lines in my neighborhood and then sold them all off to Frontier less than 2 years after they did it.  This is just after Google announced they were going to bring 1gbps fiber to some lucky towns as testbeds with their Google fiber for communities project.

These are confusing times for making a decision on an ISP.  I’m sticking with Speakeasy for now.

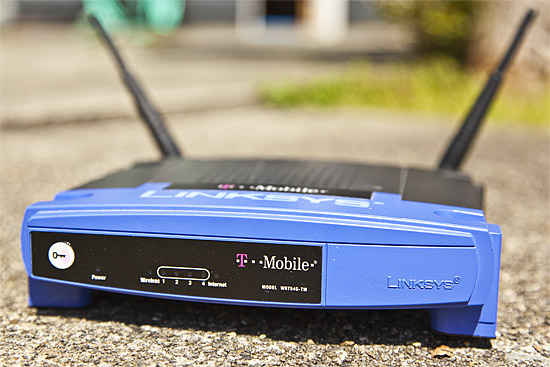
It seems that all of the Linksys WRT54G’s that I’ve come across for a good price lately are the WRT54G-TM variant.  The TM stands for T-Mobile.  In all honesty I’m not sure how the T-Mobile hot spot functionality works.  I don’t really care either.  What I know is that this router is actually an excellent candidate for a DD-WRT installation.  In fact, I’d argue that it’s even better than the WRT54GL because this one has 32MB of ram opposed to the 16MB on the GL version.  The only small downside on the WRT54G-TM is that you’ll have to jump through a couple more obstacles to make it run DD-WRT.  Don’t let this put you off at all!  There are excellent instructions out there and I’m going to give you a short overview as well.  First off, here are the official instructions for putting DD-WRT on the WRT54G-TM.

If you plan to load this firmware on your WRT54G-TM, I highly recommend using Internet Explorer on Windows.  Everything seems to go the smoothest using this configuration.  When I’ve tried Firefox on my Mac I’ve had trouble and the same goes for Safari.  Just save some pain and use IE if you have access to it.  Now for the fun stuff:

  1. Download the latest version of DD-WRT for the WRT54G-TM.  Run a quick search on this page to find it.  http://www.dd-wrt.com/site/support/router-database.  While you are there, grab the tftp program and the CFE updater binary.
  2. Set your Windows machine to the static ip 192.168.0.2.  While you are in there, click advanced and add a second ip 192.168.1.2.
  3. Pick a port 1-4 and plug it into your computer’s ethernet port.
  4. Do a hard reset on your WRT54G-TM to put it back to factory settings by unplugging the router, holding the reset switch on the back of the router, plugging it in and keeping holding the switch for 30 seconds.
  5. Log into your router at 192.168.0.1.  No username, password is admin.
  6. Click administration, then update firmware.  Update the firmware with the CFE binary file.  That should go pretty quick and say something like “Upgrade succeeded”.
  7. Wait….  While you are waiting, bring up a command prompt and ping -t 192.168.1.1.  When you get a response to your pings, you can quit waiting and move to the next step.
  8. Fire up the TFTP client and type in 192.168.1.1 for the server IP and for the file put in the location of the ddwrt.v????  firmware file.  Hit upgrade and wait.
  9. Now go to 192.168.1.1 in your web browser.  You should see a screen prompting a user password change.  Now is a great time to set your root password.

That’s it!  It sounds a lot harder than it actually is.  Post some comments on your own experiences with the WRT54G-TM.

Powered by WordPress. Theme: Motion by 85ideas.