Category: programming


Simplified Python Multithreading

I’ve been bashing my head against this topic for months now on some level.  I’ve looked around the web at people’s horrible explanations of how to use the threading module in Python and now that I figured it out for myself, let me unleash my horrible explanation on the world.  🙂

In order to properly use threading, first off, you need a task that can be passed off to a thread and done in the background in parallel with other tasks.  For example, crawling a website.  A crawler could grab a page, parse all of the links for that page and then pass all of the links off to process threads to speed up the process.

My problem before was that I was thinking about threading all wrong.  I was thinking that you launch the threads via the process you are trying to accomplish so in other words something like:

def thread(url):
    content = crawlPage(url)
    return content

^^^ BAD!!!  That doesn’t work.

The proper way to think about threads is that you are creating empty background while loops.  Those loops continue running and picking things out of your queue to process.  If there is nothing in the queue, they’ll just indefinitely loop until something shows up.  The code I’m going to show you below has been distilled down to what *I* think you need for a good thread implementation.  It has several great features such as monitoring, throttling(upwards only) and a queue.

There is some fluff in this code for purpose of demonstration that could be pulled out when it comes time for implementation but I would suggest you download/retype this code, run it and tweak it a bit to see what happens with it.  I pretty much promise you that you’ll get a better feel for how threads work after messing with this code for a bit.

#!/usr/bin/python

import time 
import Queue 
import threading 
import random

# create the queue that will feed the background threads
q = Queue.Queue() 

# this starts and individual thread that continuously 
# pull jobs out of the queue
def backgroundThread():
# this while loop keeps the thread running continuously
    while True: 
        # get the job out of the queue
        job = q.get() 
        # do the job
        print "Job output: %s" % job
        # pause so the loop doesn't spike your cpu load
        time.sleep(5)
        # report back to the queue that the task is finished
        q.task_done()

# this launches the necessary number of background threads
def launchThreads(num_threads):
    for i in range(num_threads): 
        # create the thread
        t = threading.Thread(target=backgroundThread) 
        # setting daemon mode makes threads cease when
        # main thread is terminated
        t.setDaemon(True)
        # start the thread
        t.start() 
        print "Now launching %s" % t.name
        
# launch 2 background threads
launchThreads(1)

# Main loop
while True:
    #this spins up more workers if queue gets too big
    if q.qsize() > 10:
        launchThreads(1)

    # this will be results of another process or a list/file iteration
    job = random.uniform(1,300)

    # push the job into the queue.
    q.put(job)

    # this slows down the queue filling up for demonstration
    time.sleep(random.uniform(0,1))

    # shows the size of the queue
    print "%s jobs in queue" % q.qsize()

    # this prints a list of the threads currently running
    for thread in threading.enumerate():
        print thread


If downloading the code works better for you, here’s a link to it.  threading-demo.py

This picture intentionally left blank 😉

This is a continuation of my instructions on installing Gentoo on the Libretto 110ct.  After I got xorg-server running properly, I noticed that screen blanking and LCD powerdown did not work correctly.  They produced very strange effects and did not ultimately blank the screen or power down the backlight.  This is an old computer but I intend to leave it running constantly so I want to make sure to preserve the life of the backlight as long as possible.

First off, make sure the Toshiba experimental ACPI driver is compiled into the kernel.  It’s included by default in the 3.0 and many of the earlier kernel versions.  Then you’ll want to grab toshset.  Toshset is the key to this whole process.  You can test the driver by typing:

cat /proc/toshiba

You can test it further after installing toshset by typing:

toshset -q

If all that stuff works, you are ready to move forward.

I searched the Internet high and low and could not find what I needed.  What I wanted was something extremely light weight that would use the hooks already built into xorg-server to invoke toshset.  I still feel like this must be possible even though we went a different direction.

In my search I came across exactly one person on the Internet who sounded like she ran across the same problem as me.  On her page she said:

“So what if you really do want your backlight to turn off after a specific interval? There doesn’t seem to be a way to get Xorg to do it directly. But you can cheat: Write a script that calls vbetool dpms off. Then set that script to be your screensaver. “

Sounded close, so after more searching I finally gave up and emailed Akkana and asked her how she did it.  Turns out she didn’t remember but after a couple of email exchanges, we came up with an idea together of how to do this pretty easily.  I had the idea to use a python script to poll the mouse and keyboard nodes out of ‘/dev/inputs’.  I was really pleased when Akkana emailed me back the next day and said something like “Ya, good idea, here it is!”

She sent a script that monitored the everything in ‘/dev/inputs’ and then invokes a system command(whatever you specify) when the idle time counts up to a certain point.  I modified the script a bit so that it would also run another program when activity in those nodes is detected.

When the screen is not blanked, the polling interval is 5 seconds to keep things REALLY light weight.  I tweaked it to up the polling interval when the screen is blanked to 5 times per second so there is no perceivable lag when waking up the screen.

Did I mention this script is REALLY light weight?  It doesn’t even show up in top when it’s on the 5 second polling interval.  (I haven’t ssh’d in yet to check the .2 second interval yet).  So after all that buildup, here’s the script:

#! /usr/bin/env python

# idlerunner -- run a screensaver-type program when input devices are idle.
# By Akkana Peck, akkana  shallowsky (dot) com
# based on an idea from Geordy Rostad, geordy  hotmail (dot) com
# Copyright 2011, please re-use, share and improve under the terms
# of the GPLv2 or later.

import sys, os, select
import time

# how long to wait before firing the screensaver:
TIME_THRESH = 60 * 5   # seconds * minutes

# Global polling interval
interval = 5

# Read from every /dev/input device:
INPUTDIR = "/dev/input"
inputdevs = []
for devname in os.listdir(INPUTDIR) :
   try :
       inputdevs.append(open(os.path.join(INPUTDIR, devname)))
   except :
       pass
#      print "Not watching", devname
# uncomment for troubleshooting ^^^

last_event_time = time.time()

while True :
   time.sleep(interval)
   inp, outp, err = select.select(inputdevs, [], [], .5)

   if not inp or len(inp) == 0 :
       # we're idle! But for how long?
       idletime = time.time() - last_event_time
       if idletime > TIME_THRESH :
#          print "Firing screensaver!"
# uncomment for troubleshooting ^^^
# command to blank the screen
	   SCREENSAVER = "toshset -bl off"
# Set polling to a really quick interval when screen is blanked so it wakes quickly
           interval = .2
           os.system(SCREENSAVER)
           # Let this wait until the screensaver process finishes,
           # so we won't keep checking and fire up another copy.
       else:
           pass
#          print "Idle but only for", idletime, "secs"
# uncomment for troubleshooting ^^^
       continue

   # There's apparently no way to flush input without reading it:
   SCREENSAVER = "toshset -bl on > /dev/null"
# Switch back to longer polling interval when screen saver is off
   interval = 5
   os.system(SCREENSAVER)
#  print "There's something there in", len(inp), "devices"
# uncomment for troubleshooting ^^^
   last_event_time = time.time()
   for f in inp :
       os.read(f.fileno(), 4096)

I’d stick idlerunner.py in ‘/usr/local/source’ (along with toshset).  Make sure to set it executable.  You’ll want to add a file to your ‘/etc/local.d’ directory to start idlerunner in the background.

echo “/usr/local/idlerunner.py &” > /etc/local.d/idlerunner.start && chmod 755 /etc/local.d/idlerunner.start

Next, in your xorg.conf file, you’ll need to add some lines to your xorg.conf file.  These lines will prevent the odd behavior from the built in stuff from occurring.

In the Monitor section add: 

        Option          "DPMS"

In the ServerLayout section, add:

        Option          "BlankTime"     "0"
        Option          "StandbyTime"   "0"
        Option          "SuspendTime"   "0"
        Option          "OffTime"       "0"

This all turned out even better than I had hoped because it’s independent of X entirely and blanks the local consoles as well.  Props to Akkana for generously spending her time to help a complete stranger with a problem on a 15 year old computer.

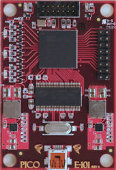
Pico Computing E101

If you are in the Seattle area and you ever wanted to learn how FPGAs work or how to actually get started with putting them to a legitimate use, Dave Hulton, of Toorcon fame has been putting on a monthly workshop at Ada’s Technical Books where he teaches a handful of people the basics.  That being said, FPGAs are not exactly basic.  I recently attended his workshop in February because I had an interest in learning what makes them tick.  I ended up getting more information than I even bargained for.

The morning talk starts out with more basic overview type of stuff like “What an FPGA is” and”What tools you’ll need to work with them”.  After a bit of talking though, it was time to dig in and write some code.  Let me stop right here and say that having at least a basic understanding of C and maybe a couple other languages would be a big plus here.  That being said, you’ll also need to forget a few things that you know.  For instance, instead of thinking in terms of variables and functions, you need to be thinking in terms of registers, wires and logic blocks(low level predefined logic functions).  Under Dave’s instruction, you’ll learn how to communicate with the device over your USB port and also how to run the device in a more standalone mode.  Dave is a great instructor and explains the process very well.

Heading into the afternoon, we started to get our hands dirty and really digging into the Verilog code.  I had a great time learning how to manipulate the hardware I/O channels on the device and making the LED’s flash in sequence.  After doing a couple of variations on this, my caffeine level dropped to a dangerous low unfortunately as we moved into implementing an encryption and decryption algorithm.  I started out getting it but it was just a bit too much for me after a certain point.  Luckily I ended up sitting next to a super sharp dude who writes BIOSes for Intel for a living and he didn’t bring a laptop so we pooled our resources for most of the day.  Regardless, even though the encryption and decryption was above my head, I still got good value out of trying to port C code over to run nativley on an FPGA.

My original goal for signing up for the class was to gain a deeper knowledge of FPGA’s, how they work, why they are so good at these encryption tasks and playing with something that would otherwise have too steep of a learning curve without vast amounts of front end effort.  All in all, it was $60 WELL spent.

On top of having the workshop, Ada’s is also hosting a monthly meet up for workshop alumni.   Contact Ada’s Technical Books for more details on this event.  I have taken the liberty of attaching the class description down below.  By the time you read this, the date will probably be past but judging on the success of these classes, I have a feeling they will keep offering them for the foreseeable future.

FPGA Workshop

March 12th, 2011: 10am-6pm

Another Intro to FPGA Design workshop! The workshop will be taught again by Ada’s
co-owner, David Hulton. David has over 10 years of experience in the computer security
industry and is most recently a co-founder of Pico Computing, a Seattle based FPGA
board manufacturer specializing in embedded and high performance computing applications.
David spends most of his time breaking cryptosystems using the massive amounts of
FPGAs he has access to at work and supporting Pico’s security-related customers.
David has presented at dozens of conferences around the world and has been featured
in numerous online and print articles (most recently mentioned on the cover of Forbes
Magazine May 2010). He spends his free time running ToorCon, a San Diego and Seattle
based computer security conference and helping his wonderful wife run Ada’s Technical
Books in Capitol Hill Seattle.
The workshop will be on March 12th from 10am-6pm with an hour break at 1pm for a
catered lunch. It will cover:

-An Introduction to FPGAs

-An Introduction to Verilog

-Writing a “Hello World” bus communication example

-Toggling/Capturing LEDs and GPIO

-Implementing a basic crypto algorithm in Verilog

The cost is $60 or $360 with a Pico E101…(links removed for clarity, contact Ada’s for more information)  Or, you can come into the store to purchase. Hurry though, there are only 7 spots available and last time they sold out in less than 24 hours!

The O’Reilly School of Technology recently started offering a 4-part Python certificate course.  I have just recently completed the first part of the course and wanted to share some of my impressions.  The course is ‘cloud-based’ and served to you over an RDP connection.  They provide you links to Mac OSX and Windows versions of the RDP client so either way you are covered.  When you log in, you are dumped into the Eclipse IDE environment and walked through how to navigate the environment and set it up for your use.  Love or hate Eclipse, you will be forced to use it through this course.  I personally did not like Eclipse too much before I signed up for this course.  Now that I’ve been using it a lot more I have decided it’s not so bad and I could probably grow to like it at some point.  The further into the course you get, the more you realize why they made the decision to use Eclipse.  Largely because it allows them to embed a web browser and they can run their other courses for Java, etc all off of Eclipse.  Anyhow, enough about Eclipse…

My first impression of the course was not really so good.  I kinda felt like I was just reading an abridged version of a $50 book.  But after completing a few lessons I can see the value in essentially being forced to apply what you learn in each lesson.  Is it worth the $300-$400($300 if you happen to catch it on sale)?  Well that depends on your specific needs.  If you want to go for the full certificate, you will spend $1200-$1600 because there are 4 separate courses you need to complete in order to obtain the cert.  On top of that, there is a $15 monthly lab fee for using the system where the course is hosted.  $1600 MIGHT be cheaper than your local university or perhaps your local university doesn’t even offer Python in the first place.  I know some folks that were recently enrolled in a prominent local university’s Python course and they ended up feeling it was a complete waste of their time.  Apparently the teacher kind of sucks.  That’s good money down the drain unfortunately…  Fortunately their employer is paying that bill.  The OST course is nice because you can just try one module of it and if you don’t like it, don’t go any further.  There is also a 7 day money back guarantee.  Keep in mind that if you have completed more than 40% of the course in that first 7 days, you will no longer be eligible for the money back guarantee.

For me, I’m in it for the knowledge.  I want to learn to be a better programmer and I think Python is a great language to help with that goal since it’s so deep and versatile yet simple enough to understand the fundamentals with a little bit of effort.  If your company will pay for you to obtain a Python cert with O’Reilly, I would say go for it.  No question.  If it’s your own money you are spending, I would suggest trying to go through a book such as Learning Python by Mark Lutz.  That is what I started with and I’m glad I did.  It allowed me to fly through the O’Reilly course and get more value for my money since the course was reinforcing and clarifying concepts that I had already come across in the book.  I wouldn’t mind having the Python certificate and learning the rest of the knowledge the course has to offer but I’m not so sure I want to spend another $900-$1200 to get to that point right now.

As far as specifics of the course, I felt that it started out with a slightly higher than beginner level.  If you’ve never programmed before and never even tried to play around with Python, you might get lost in place.  There is an instructor available via email but there is a lag if you are working on the course after business hours.  The course makes a couple assumptions about prerequisite knowledge.  My suggestion would be to at least skim a Python book even if you don’t punch in code out of the book as you read it.

I spent several weeks deciding whether I wanted to do this Python course.  I discussed it over with a few friends and what finally convinced me to just give it a shot was the words of one person in specific…. “Well, it can’t hurt any now can it?  It won’t make you any worse at Python, right?”  True enough.  In the end I definitely feel like I have a much deeper understanding of Python and I can now converse with other Pythonistas in a semi-coherent manner.  So for me, yes, it was worth the $300.  As an added bonus, you get a free ebook of one of their beginner Python books.  For me it was “Head First Python by Paul Barry” which incidentally is a fairly new release for them.  On top of that, I got a discount code for 40% off of any of their printed books.  That sweetens the deal if you are in the market for any of the O’Reilly books.

Bottom line is that I’m happy with my purchase and would do it again given the choice.  If you have completed this course yourself or are thinking about taking it, please feel free to post a comment down below.  I would be interested in some additional perspective.

Now I wish they could figure out how to do one for developing iPhone apps 😉

I’ve been working on learning Python lately and there is a boatload of good information out there that is scattered all over the Internet.  Luckily in the spirit of open source software, most of the information is free.  Some of it can be had in more convenient packaging for a low price alternatively.  Personally, my primary focus is Python 3.0 since that is the future and I don’t expect to be working on any legacy Python code before I learn Python much, much better.  By the time I get to that point of confidence I’m sure I’ll be familiar with the nuances of Python 2.6-2.7 though.  Python 2.7 is the last major release of the Python 2.0 series as of this writing.  The developers intend to do bug fixes for 2-5 more years but there will be no new features added.  If you insist on using 2.7 or 3.x is not available, you are not totally S.O.L. though.  There is a library called “future” that has many features from the newer series so you’ll be able to use them in your 2.x code.  Anyways, on with some of the resources…

Podcasts:

I’m heavy into podcasts since it’s something constructive I can listen to while cooking dinner, driving, etc.  There happen to be three great Python podcasts out there that I know of(if you know of any other current ones, let me know). Most of the resources that I am going to share with you below were parsed by me from listening to these podcasts.

Python 411 – The first one I checked out was Python 411.  This one is a one-man show but he does a great job keeping it interesting by interviewing developers and other folks that use Python in their day to day jobs.  He branches off into scientific and sometimes philosophical realms but it’s all going to be interesting too the average nerd who is interested in learning Python anyhow.

From Python Import Podcast – This was the second Python podcast I discovered.  It’s relatively new to the scene and features 3 slightly jaded developers who are obviously good friends aside from coworkers.  They tend to rant on some higher level topics but I think it’s valuable to listen to anyhow if you are interested in taking Python further than just a hobby.

A Little Bit of Python – This podcast features several core pillars of the Python community and they discuss all kinds of topics from cons to newbie items.  There are a few good interviews as well with some other large names in the Python community.  If Guido were to come onto a podcast, this would probably be the one.  As a bonus, this podcast has a bit of European flair as well.

Reading Material:

Unfortunately, more than just podcasts will be required to learn Python. There are PLENTY of great books out there but most of them are still for Python 2.x.  Here are a few resources that I have managed to hunt down for Python 3.

Python Docs – The obvious place to go is the official Python docs and if you look in there, you will see the official Python Tutorial.  If you have an iPod Touch, iPhone or iPad, you can also purchase(from the app store for $.99) an offline version of the Python 2.6 docs.  Even though it’s for 2.6, it’s still worth having even if you are focused on Python 3.x.

Learning Python by Mark Lutz – I have seen good and bad reviews of this book but I personally think it’s a great place to start.  The bad is that there is a lot of repetition and he teaches you the wrong way to do things before teaching you the correct way but on the converse, it’s good to know that there are so many ways to do things in Python since it can spark your creativity if you are not a veteran developer.  If you are very experienced in some other language, perhaps you’ll find this book too slow.  For me, it’s been mostly a good read.  SOME of the examples in the book are the most clear cut ones I can find on there topics anywhere.  If you have an iOS device, you can purchase a standalone e-version of the book for under $5.

Instructional videos:

If you learn better by watching it done, this might be just the ticket.  There are several excellent Python specific video sites out there so it’s worth a bit of your time to check out some of the videos.

Showmedo – This site was started by a guy that was trying to put together some distance learning materials for a company.  The videos are all provided by individuals and are all rated and monitored for quality.  This site doesn’t have EVERYTHING that I’ve looked for but there is a lot of good info here.  Be aware that SOME(not many) of the videos cost money to watch.

Python Miro Community – This site has video archives of several pycons on top of several other categorized videos covering other Python-related subjects.  I just found this site as of today so I have not had time to make a quality assessment yet but the interface looks great and the some of the categories look quite promising.

Interactive Learning:

If you learn better by doing, this is something you should check out.

Python Koans – The Python Koans are based on the Ruby Koans.  What’s a Koan?  According to the wiki, “It consists of a story, dialogue, question, or statement, the meaning of which cannot be understood by rational thinking but may be accessible through intuition“.  That describes the theme of the koans but in practice, it’s a series of tests build upon each other.  So when you run the Koan, it will fail.  You will then need to jump into the code and figure out what is wrong with it to make it pass the test.  There are MANY MANY tests here.  Even if you are a cracker jack Python wiz, it would probably still take you 2-3 hours to plow through the Koans.  They are available for Python 2 and Python 3.  When you download the package, you get both.  The Python Koans are probably the quickest way to jump into coding some Python.  The tests start out at a very basic, beginner level and if you pay attention to HOW the tests fail, you will see clues to help you succeed.

O’Reilly 3-part Python certificate course – This is a 4-part course(at $400 per part) that is offered remotely and somewhat interactively by the O’Reilly School of Technology.  When you complete the third part of the course, you will receive a certification in Python from the University of Illinois.  I cannot vouch for this course since I have not taken it but I am certainly considering it.  The price is a little steep but still MUCH cheaper than the one offered locally to me by the University of Washington.  The course is brand new so it focuses on Python 3.  I looked around online for some reviews and the O’Reilly School has had some mixed reviews.  Most of them stated the the material was outdated(won’t be a problem here) or that the course was not challenging enough(ymmv).  Whatever the case, at the end, you will receive a certification for what it’s worth.

Python Meetups – There are 95 groups in 60 cities in 12 countries.  Surely you are near one of these.  I have not gone to one yet but I do look forward to it.  There are 3 groups in the Seattle area alone!

Python in 5 minutes

I will start out by saying this title is a little misleading but I’ve been trying to learn some Python lately and I have figured out some things that will help you get well on your way to learning Python in about 5 minutes. I won’t say that I know Python well at this point but what I DO know is how to figure a lot of things out without cracking open the manual. For starters, get Python installed. I’ll leave that part up to you. After that, you’ll want to open the Python interpreter by typing python at the command line in your particular operating system. You can’t save your code while you are in the interpreter but you can safely play around in your own personal sandbox.

First lesson – Strings: At the prompt, type in something like:

>>> s=’Spam!’

That will put a value into memory that you can play with.

Second lesson – dir() & help(): Not only is “s” a string, it’s also an object.  This lends itself to all kinds of neat things that I will let you figure out on your own but one of the coolest features is that you can tack string attributes on it very easily.  How do you know which attributes will work?  This is where dir() comes in.  At the interpreter prompt, type:

>>> dir(s)

This will show you a huge list of attributes that can perform operations on your string.  For instance, you can use:

>>> s.swapcase()

This will print something like ‘sPAM!’ at on your screen.  If you want to change the variable, you can use:

>>> s=s.swapcase()

Now what if you see another attribute in the list who’s function isn’t self explanatory?  This is where help() comes in.  Say that you don’t know what the “zfill” attribute of a string means…  Type:

>>> help(s.zfill)

You’ll get the exact explanation of what the attribute does right at your prompt.  You can also simply do a help(s) but you’ll get pages of help that will scroll off your screen.

There is a LOT more to python than this of course but these couple of bits of knowledge will help you learn a lot of python’s tricks just by playing around with code at the interpreter prompt.  Of course you can’t go wrong reading the python documentation either.  It’s pretty good and thorough.  I wouldn’t suggest buying a book until you give that a shot.  If you do still need a book, I like Learning Python: Powerful Object-Oriented Programming.

TinyELF subtraction

After a long break from Tom Pittman’s online book A Short Course in Programming, I’m digging in again to attempt to understand the second half of chapter 5.  I’m still running the same suggested program which is 5.1 ALU OPS.  The bytecode for subtraction is F5.  There is nothing profound about this command other than you enter the data backwards.  For instance, it’s not:

3-1=2

It’s more like:

(-3)+1=2

If you screw up and go the other way with it, you won’t end up with 2 for an answer, you’ll loop register and come up with FE.  Makes sense to me since 1-3=FE on the 1802 which cannot directly represent signed numbers natively.  So the thing to take away from this is that the “negative” number is the first operand that you will input after the instruction.  The second number will always be interpreted as a positive number.

The next subtraction instruction is FD which tells the 1802 to subtract the next byte in memory after the instruction from whatever is in the memory location 0060.  The third byte of the default, unmodified program is ignored and replaces with C4 since that lives at location 2A in memory.  If I put in FD, 01, 55, the computer does this:

(-01)+C4=C3

This part of the chapter is getting sticky for me again.  Hopefully I’ll be ready to muddle through it some more shortly.

Moving on with chapter 5 of “A Short Course In Programming“, I’m finding some more nifty opcodes to dissect.  These versions are sort of the evil twins of the first three that I went over in part 1.  Key in program 5.1 if you haven’t already.

ORI – The bytecode for ORI is F9.  Let’s bring back the pair we’ve been using all along.  F9, 33, 55:

33 = 0011 0011

55 = 0101 0101

F7 = 1111 0111

Woah!  What’s the deal?  This isn’t what we are used to at all.  Let’s flip this thing backwards and see what happens:

55 = 0101 0101

33 = 0011 0011

D5 = 1101 0101

Hmmm, that didn’t help.  Perhaps a different approach:

FF = 1111 1111

FF = 1111 1111

FF = 1111 1111

Well I suppose that’s a little better.  The brute force learning method isn’t working for this one.  Time to get to the bottom of this…  Ok.  Slowing the computer to single step through gives a bit of a clue to what is really happening here.  The 33 is not being read at all.  It’s entirely being ignored.  When the program runs, you could put anything in for the second value and it won’t change the outcome because C4 is hard coded into the program in location 002A which is the byte immediately following 0029 where our opcode lives.  When we write it out like this, it makes a ton more sense:

33 = 0011 0011

55 = 0101 0101

C4 = 1100 0100

F7 = 1111 0111

AHA!  We are back to a plain old OR.  This time however, instead of taking the input value from the 0061 location, the F9 opcode ignores the SEX 6 instruction and addresses the immediate byte instead.  I’m sure this will come in handy in the future, I just don’t know how yet.

ANI – Ho hum, more of the same funny business here.  Try FA, 33, 55:

33 = 0011 0011

55 = 0101 0101

C4 = 1100 0100

00 = 0000 0000

ANI is AND in disguise but also ignoring the E6 opcode and simply comparing the datum residing in the next byte of memory.

XRI – Do I even need to explain this one?

33 = 0011 0011

55 = 0101 0101

C4 = 1100 0100

F7 = 1111 0111

XRI is XOR in disguise but once again ignoring the second datum, 55.  As a refresher, XOR changes all bits that are different to a 1 and all bits that are the same to a 0.

ADD You probably think ADD is going to be super easy with no gotchas.  You are mostly correct.  There is only one little thing…  To demonstrate this, I’ll change the numbers up a bit.  The bytecode is F4 BTW:

FF = 1111 1111

01 = 0000 0001

00 = 0000 0000

DOH!  We just blew it.  If you have your “1802 State” window in TinyELF open however, you’ll see that the DF bit is now set high.  This means that FF + 01 actually equals 0100.  Let’s take one step back and check out something more palatable:

33 = 0011 0011

55 = 0101 0101

88 = 1000 1000

If you thought we were through chapter 5, think again.  This is only about half way there.  Oddly, we are also half way through the entire book at this point.  It’s been a long journey, don’t quit now.

I got a bit stuck at the end of chapter 4 of Tom Pittman’s book “A Short Course in Programming“.  Some of the concepts of registers become a bit hard to track but I think I have those fairly well figured out.  Now onto a new tougher section; section 5.  One nice thing about this section is the fact there is only one program to enter.  Unfortunately it’s a bit of a monster compared to the previous programs.  It spans almost 50 bytes!  This program is one of the coolest so far though.  It allows you to put in any opcode and then two bytes of data and see what the outcome is.  The inner workings of the program (5.1) aren’t important here.  The important thing to grasp is what all of these logic and arithmetic opcodes are actually doing.  I will attempt to explain what I think the computer is doing as I figure that out myself.

One interesting note is that the 1802 is computing in binary but you are going to enter everything in hex and get all of your results back in hex.  Follow this link if you need help converting between binary, decimal and hex.

OR – The first opcode that Tom refers to is OR.  OR falls into the logic category.  When I plug into the program F1, 33, 55, I get a value back of 77.  Same goes for F1, 55, 33.  So what is the computer actually doing?  55+33 would be 88 so it’s not adding the numbers together, or is it?

It sort of is.  If you break the numbers back out to binary, this is a little easier to follow:

55 = 0101 0101

33 = 0011 0011

77 = 0111 0111

If you look at the table above, you’ll see that OR is saying that if either of the bits is set to 1, then set to a 1.  If both bits are set to 1, it’s still one.  If both bits are 0, then it’s still 0.  It’s comparing the numbers moreso than adding them together.

If you enter F1, 33, 33, you’ll get 33 because the bits are identical in both bytes so nothing will change.

Let’s test the theory on bigger numbers:

A9 = 1010 1001

DE = 1101 1110

Look at the table.  You should easily see the answer if you understand this concept.  The A byte corresponds with the D byte.  There is a 1 for every spot so ORing them together nets a result of F or 1111.  Now looking at the 9 byte and the E byte, there is also a 1 for every bit there so the result is F as well.

AND – The opcode for AND is F2.  If OR made sense to you, AND should be a piece of cake.  Let’s try our example of F2, 33, 55.  The result is a very perplexing 11.  Putting in F2, 55, 33 will net the same result.  Why?  Let’s look at the binary for the answer:

33 = 0011 0011

55 = 0101 0101

11 = 0001 0001

AHA!  The binary bits BOTH have to be set high in the same locations.  5 and 3 only share one common bit that is set high.  That is the 1 bit.  For the bonus round, how do you get a result returned of FF?  It’s pretty easy when you think about it.  FF has ALL bits set high.  AND only returns a high bit if all corresponding bits are set high.  So F2, FF, FF = FF.  There is only one right answer for that question unlike the OR operations.

XOR – This only sounds scary and confusing because XOR (zor or x-or) is not a familiar word in the English language.  The concept is really fairly simple when you look at it in binary.  Once again, let’s pull up our trusty pair 33 & 55.  F3, 33, 55:

33 = 0011 0011

55 = 0101 0101

66 = 0110 0110

HUH?!?  Where did this 66 come from you say?  Look closer.  If one OR the other bit was set to 1, a 1 is returned.  If both bits were set to 1, you get a 0 back.  If both bits were set to 0, you get a 0 back.  Make sense?  Let’s test the theory on some more interesting numbers:

E9 =1110 1001

3A = 0011 1010

D3 = 1101 0011

FF = 1111 1111

00 = 0000 0000

FF = 1111 1111

This concludes part 1 of my post.  In my next post, I will dissect the ORI, ANI & XRI operators.  Should be interesting…

TinyELF direct keypad output

When I first booted the TinyELF before I had ANY clue how to use it, I did what most people would do.  I started punching hex keys in and staring dumbly at the 2 digit display wondering why it didn’t do anything.  Finally, today, I know why.  It’s because it didn’t have this program I wrote up:

0001   6400   OUT4    Clear display

0003   90       GHI        Zero the accumulator

0004   B6       PHI       Set R6 hi to 00

0005   F820   LDI       set accumulator to 20

0007   A6       PLO       Set R6 lo to 20

0008   E6       SEX 6   Point input and output at location 0020

0009   6C      INP C     Read keypad and store at 0020

000A   64      OUT 4    Read 0020 print to display

000B   3002  BR          Loop back

Simple program but it proves a point.  All these years you have expected to push a key, button, knob, whatever and get some sort of feedback, right?  Well that only happens because someone along the way made it so.  In fact Apple has teams of engineers that specialize in nothing but that sort of thing.

Take another look at the computer you are using right now and consider how many lines of code are running behind the scenes that represent seemingly tiny and minute details of how your system behaves.  It’s mind boggling and testament to team work at it’s finest.

Powered by WordPress. Theme: Motion by 85ideas.