Category: security


BlackSheep and FireShepard failure

Tonight was protocol study night at my local hacker space where 5-10 people get together every Wednesday to dissect various networking protocols to see how they tick.  We use a combination of things like Wireshark, The TCP/IP Guide(the bible), and the internet RFC archives to rip apart protocols and analyze live traffic in a group setting.  Tonight, the subject was HTTP with a focus on FireSheep and the two mitigation tools BlackSheep and FireShepard.

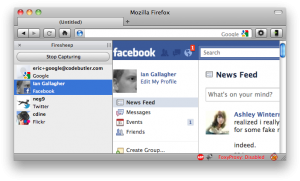
So by now everyone has heard of FireSheep.  The concepts are nothing new but the author put everything into a pretty little browser plugin that makes it super easy for ANYONE to steal your Facebook, Twitter, etc credentials.  Within a day or two of FireSheep being released, BlackSheep quickly followed.  The premise of BlackSheep is that it is supposed to protect you from users of FireSheep and not allow said users to steal your credentials.  This would be nice if it actually worked.  I’m here to tell you that it does NOT work.  FireSheep looks like this:

So what both BlackSheep and FireShepard do is attempt to perform a Denial of Service attack of sorts against the user running FireSheep.  They spam FireSheep with fake sessions and credentials that show your name but won’t actually log you in.  They show up in your FireSheep window and attempt to flood your buffer with too much information.  The problem with this is that your working credentials are still there and can still be used.  The attacker merely has to sort out all the fake credentials, find the real ones and click on them.  FireShepard has even more failure in this regard.  The spoofed HTTP headers have several fields in them that are always identical.  My favorite was this one:

request+=”GET /packetSniffingKillsKittens HTTP/1.1\r\n”;

Even if FireShepard did work better than it does(which is basically not at all), the person running FireSheep could then easily filter out all the spoofed credentials by filtering it on that phrase.

BlackSheep, on the other hand, attempts to detect if the fake credentials are being used and is supposed to alert you if this is the case.  In our testing however, we did not see any indication of this feature working properly.

If FireSheep isn’t scary enough, we observed some other scary behavior of facebook’s cookies.  Most notably, we hit logout(explicitly) on the Facebook session and closed the browser and cleared/restarted FireSheep.  When we reopened the browser and went to Facebook, we were not yet signed in on the Facebook page but when we switch BACK over to Firesheep, we were already logged in!!  In other words, we merely had to go to Facebook’s page for a cookie to be transmitted to them that allowed a full login.

Not all bad news…

We did find one good solution to this mess.  It’s not a sexy new tool but instead something that I hope a lot of us are using already.  The EFF’s HTTPS Everywhere Firefox browser plugin put a stop to FireSheep picking off any of the credentials.  We tested this with a Gmail, Facebook and Twitter.  Not one of them showed up on FireSheep after enabling HTTPS Everywhere.  I have been using this plugin since it was released and have been extremely satisfied with it.  My only complaints are that I have had problems with the HTTPS side of certain sites not loading correctly for me.  Most notably Wikipedia and Twitter(for about 24 hours).  Other than that, it’s been flawless.  It’s one of those plugins you can basically set and forget.

Using a VPN and avoiding open public wifi connections are also great ideas.

Follow this link for more information on FireSheep, FireShepard and BlackSheep.

SecuraBit podcast review

I’ve been meaning to review the SecuraBit podcast for a long time but the most recent episode(Episode 67: We’re all gonna get HAX!) pushed me to do it.  Their format is fairly informal and that has sometimes led to what they refer to as a “SecuraBeer” episode where everyone talks over each other and the topics drift into the gutter but SecuraBit has been REALLY stepping up their game lately and delivering some excellent content.  I would said pretty much everything in 2010 has been great.  They focus on malware forensics, reversing and several other topics along those lines.  I’m glad that I stuck it out with them and kept listening because an earlier review would have been unfair.

That being said, EVERYONE needs to listen to episode 67.  Everyone who uses a computer at all for anything at home, at work, or wherever should hear what there guest, Roger Grimes, has to say about antivirus software, patching, embedded systems and all of the fortune 10,50, 100 & 500 companies of the world.  The message is fairly grim but it boils down to antivirus NOT being a magic bullet.  Roger also mentions how fake antivirus is the number one source of infection that he encounters.  He goes on further to talk about Mac OS X and people’s blind ignorance when it comes to OS X security. He refers to Charlie Miller winning the “Pwn to Own” contest at CanSecWest:

Roger takes a minute towards the end to plug his own favorite operating system, OpenBSD.  Even if you don’t understand some of the things Roger is talking about at the start of the interview, stick it out.  He starts speaking in very plain English towards the middle and the message is something that everyone needs to hear and anyone should understand.

I’m looking forward to many more well-picked interviews on SecuraBit.  It seems that they have finally found their niche.

Your Mac knows where you live

With all of the recent excitement in the security world about people’s concerns regarding smart phones that know your location, a bigger problem has been overlooked.  Most Macintosh users probably don’t realize that there is a feature called “location services” in OS X 10.5 and later.  This feature is not widely publicized but I assure you that it’s there. This feature queries a database and determines your location based on which wifi access points can be seen by your computer every 12 hours or when invoked manually via a web browser or other application.  I’m not sure how well this works in the more rural areas but I live in a suburban area and location services pinned my down within 100 feet or so.  Apple’s statement on the matter follows:

“The data collected to provide your location does not identify you personally. If you do not want such data collected, you can choose to disable the feature, which does not negatively affect your Mac in any way.”

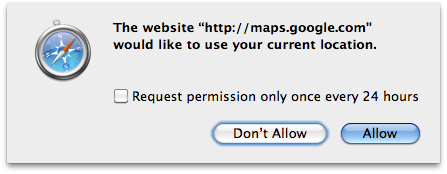
If you would like to test your own computer just go to Google Maps.  See that tiny button under the 4-way arrow in the upper left corner?  Push it.  I tested this under Firefox and Safari.  Thankfully they both had the courtesy to ask me if I would like to allow the web page to query my location.  The thing that struck me odd is that Apple seems to have left it up to the application to ask you if you would like to allow use of the feature.  Potentially a malicious application could use this in the background without your knowledge.

To my knowledge, any Macintosh with a airport card using OS X 10.5, OS X 10.6 or any Windows box with Safari has location services enabled by default.  Here is how to disable location services.  I’m curious why Apple thought that this should be a default setting in your operating system.  Thanks Apple, but no thanks.  My computer on my static IP is querying the mother ship every 12 hours to figure out where I’m sitting with my computer.  For some reason, I just don’t like that.

How to dig for DNSSEC records

DNS Security Extensions (DNSSEC) has been in the works for several years now but as of July 15th, 2010 (with little fanfare), the 13 name servers operating the root zone of the Internet’s Domain Name Servers (DNS) are now digitally signed with DNSSEC.  So far DNSSEC is mostly being rolled out by government and financial institutions but many other web-facing entities may soon follow because of the perceived advantages.  If you want to learn more specifically about how DNSSEC has been implemented at the root, check out http://www.root-dnssec.org/.

Up until recently, who.is has been my one-stop shop for records queries but when I query sites that I know have implemented DNSSEC, I can find no indication of this via who.is.  I recently participated in a local DC chapter protocol study night and learned about a couple of new tools and other interesting things about DNSSEC.

www.dnsviz.com – Compliments of Sandia Labs we are provided with “A DNS visualization tool” (dnsviz).  This allows you to view the public key of any given site that is using DNSSEC and shows you a flow chart of how the key is implemented.  It will show you the line between trusted and untrusted portions of your target’s website and help diagnose issues if you are configuring DNSSEC for your own entity.  I did find an interesting feature about this site.  When you are the FIRST person to ever use this site to query a DNSSEC-enabled url, it will take a couple of minutes to spit back the response.  Apparently I was the first person to think of querying bac.com.  After the first time a site is queried, the results are spit back almost instantly for anyone else that queries it.

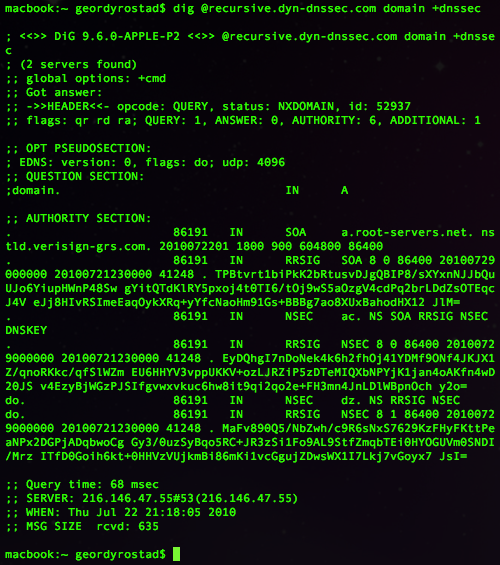
dig – Not to be confused with the ubiquitous social media tool digg (give this article some diggs if you’re a member ;-), the Domain Information Groper (Dig) is a command-line tool that allows you to do deep queries of DNS records and explicitly include the security extensions.  It should be considered a replacement for nslookup.  I found that it was already installed on OS X 10.6 by default but on my Gentoo VM I had to emerge bind to access the dig command. Dig will not give you the security extensions by default in either case.  You will have to explicitly ask with a command such as:

dig @recursive.dyn-dnssec.com domain +dnssec

This will return results similar to the following screencap:

For more information on DNSSEC, you can check out O’Reilly’s DNS and BIND.  Here are some other relevant links for more information.  If you only check one of the links below, make sure you read The Register’s take on DNSSEC since it gives you the quick overview of the situation.

I was listening to the ISD Security Podcast episode 168 the other day and heard this great interview with Paul Royal researched and helped shut down the original Kraken botnet in 2008. While the whole interview was excellent, one part at the end stood out as something that should be documented. Rick asked Paul how someone could get started in malware analysis if they are interested. The following is my paraphrased version of Paul’s response:

Check out the following sites to obtain malware samples:

Malfease – which is a public malware repository hosted by Georgia Tech. You don’t have to be a student at Georgia Tech to use this service. From the FAQ: “Q) What is the purpose of Malfease? A) Malfease is designed to automate many of the tasks associated with new malware collection. With thousands of new samples created each week, automation can help reduce the burden on researchers and industry analysts.”

Malware Domain List – is a site where volunteers document different malicious domains found on legitimate compromised sites, etc and has links to download some of the malware. There are several very interesting links right on the front page of the MDL that anyone interested in malware analysis, prevention and incident response should check out.

With the above links you can purposely download malware and allow it to exploit your virtual machine or other sandboxed environment running known vulnerable, unpatched software or software vulnerable to zero day threats. Once this has been done, you can study it at various different levels:

  • At a basic level, study the network traffic patterns with a tool such as Wireshark.
  • Next you could run it with a live binary analysis tool such as OllyDbg
  • You can also do a static analysis with a debugger/disassembler such as IDA Pro.

When you are ready to move beyond those initial methods, install Linux on a system that supports hardware virtualization extensions. Then you can delve into tools such Ether in conjunction with the Xen virtualization platform. This will allow you to play around with much more sophisticated malware and figure out how it operates.

Continue experimenting and piece by piece you will start to understand how the “modern threat landscape” works.

Whenever you get rid of an old hard drive you should always wipe it.  This goes without saying but what does “wiping a drive” entail?  When I say wipe, I mean more than a format.  I even mean more than a destructive format.  If you’ve had to wipe a disk for work or some other reason, you’ve undoubtedly heard of Darick’s Boot and Nuke A.K.A. DBAN.  This is a great tool that will fill all of your sectors with zeros.  It will even do multiple passes to comply with different data sanitization standards.  It’s self-contained and easy to use but it has a limitation…

DBAN cannot wipe data blocks that your hard drive has internally marked as “bad” in the g-list(grown list).  The g-list is created by firmware in the hard drive whenever a sector takes too much time to access.  When the firmware detects that a sector is slow, it determines that the sector is bad and if it can read the data, it will COPY the sector to a new physical location on the disk and this will be reflected as an updated entry in the g-list.  Of course this is all done in a way that is totally transparent to the operating system.  Windows or whatever other system will have no idea this has occurred and will just continue plugging away.  But what about that “bad” block?  If it’s bad, it can’t be read anymore, right?  Maybe, maybe not.  There are tools that exist that have entended control over the physical hard drive that sometimes CAN read that data.  It might not be much if you don’t have a lot of bad sectors but it’s probably something and it’s probably not all zeros.

The situation sounds a little grim but the manufactures of IDE hard drives thought of a solution.  There is a command in the ATA command set that will make the hard drive erase itself, good AND bad blocks.  This will require a couple of things though.  You will need a bootable MS-DOS(compatible) disk and a hard drive attached directly to your IDE controller.  This will not work through a USB-IDE enclosure since USB doesn’t support a full implementation of the ATA command set.

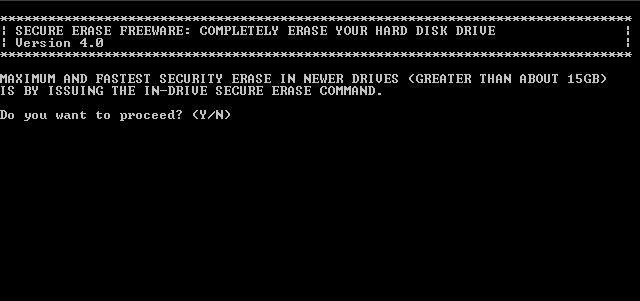
You will also need a free tool called Secure Erase.  It is graciously provided by the Center for Magnetic Recording Research (CMRR) along with instructions but no support.  It’s a very small, simplistic program but it does a simplistic job.  I am going to borrow a chart from the Secure Erase documentation. I would like to point out that DBAN would share the “medium” slot with the DOD “Block Erase” and I also slightly disagree with the author on the final method suggested:

Type of Erasure Average Time

(100 GB)

Security Comments
Normal File Deletion Minutes Very Poor Deletes only file pointers, not actual data
DoD 5220 Block Erase Up to several days Medium Need 3 writes + verify, cannot erase reassigned blocks
NIST 800-88

Secure Erase

1/2-2 hours High In-drive overwrite of all user accessible records
Enhanced Secure Erase Seconds Very high Change in-drive encryption key

In my opinion, the Secure Erase tool should be considered as good as it gets for software solutions.  I can’t see how changing the in-drive encryption key could possibly be more secure than making the hard drive obliterate every single block, good or bad.  The encryption is EXCELLENT right now and for all practical purposes unbreakable but does anyone else remember when Netscape was limited to exporting 40-bit encryption because we didn’t want foreign countries to have anything better than we could crack?  That quickly was tossed out the window and clever cryptographers have now broken far more sophisticated algorithms.  Seems like breaking or bruteforcing(practically) any encryption is theoretically possible with enough computing horsepower but perhaps I’m entirely misunderstanding the author’s statement.  If the chart kept going, the BEST possible way to sanitize your data, of course, is to shred the drive.

CBS news recently reported that copy machines manufactured since 2002 have hard drives.  As usual, CBS went out of their way to sensationalize the story.  If you have not seen the video, here is the link to the original story:

Digital Photocopiers Loaded With Secrets

If you just take that story at face value and don’t question it at all, you would be terrified into thinking that your own insurance company, the social security administration and maybe the police department all have allowed copy machines containing piles of your personal data to be returned to be resold at the end of a lease period.  This is not entirely true and has been blown out of proportion by the media hype machine as usual.

Many companies have policies that allow them to retain(for destruction) the hard drives in their copiers at the end of a lease period.  Others will wipe the drives before returning them to the leasing companies.  I would urge any company who does not have such a policy in place to enact one immediately.

Next, the video leads viewers to believe that there is an option to add security to these copy machines but it costs $500 extra and nobody does it.  That option the video is referring to is a scrambler board specifically for Toshiba copiers; others may have such an option too.  I suppose that is a nice option but most(all?) copiers have settings available (in minimal configurations even) to ensure that documents aren’t stored on the hard drive after they are printed off or at least are deleted after a certain amount of time passes.  Yes, forensics can recover deleted files but this is one more hurdle for an identity thief to jump over and I would wager that most of them don’t have the skills for such a task.

Lastly, the video alleges that these 4 copy machines were picked “randomly” by page count, age, etc.  BULL!!  I don’t buy that for a minute.  I would love to have been there in person to watch them cherry pick the four machines they dragged back to their office.  “Look, insurance company asset tag, we’ll take it!”

All in all this story seems like a bunch of FUD.  These used copy machine warehouses being a candy store for identity thieves makes a nice news story but don’t forget that A) It takes a bit of effort and money to drag home a bunch of copiers at random to mine for data.  B) Much of the world’s population of identity thieves are overseas and mining data on copiers isn’t really practical for them anyways. C) Identity thieves usually go for the lower hanging fruit.  It’s way cheaper and easier to dumpster dive or steal your mail to gain the information they need.

That being said, you can’t count on anyone else to sanitize your used devices.  That includes old cell phones, ipods, laptops or anything else that might have personal data on them.  Always check those items before they leave your possession.

Powered by WordPress. Theme: Motion by 85ideas.