Latest Entries »

Fun and frusteration learning to use Kicad

Yesterday I started another little project.  I’m going to add a serial port to my Zipit Z2.  There are lots of good reasons to do this which I will further detail in another blog.  The Zipit Z2 technically has a serial port already on the motherboard but the outputs are not at levels that conform to RS232 standards so I need to add an RS232 transceiver to convert the levels properly.  The chip I’ve chosen is the Maxim MAX3221CAE.  This isn’t a standard dip that I could just throw on a piece of perf board and call it a day.  See, unlike other Zipits I’ve seen serial-modded, I want to fit the whole mod inside of the Zipit.  There just isn’t enough space for a big old dip anywhere in the unit.  My is to use a tiny surface mount 16-pin SSOP on a custom made paper-thin PCB.  Of course this leaves me with needing to design the board.  I’ve hand drawn boards before that use SMT’s but this one is just too tiny to be accurate.

A hand drawn PCB I made a few years back.

For this project, I need to be much more accurate and make a much smaller board to fit the limited space I will have.  This is where I need a software package like Kicad.  Kicad has many different libraries of existing components built into it already and 1000’s more available via packages on the net.  Kicad is NOT straight forward though.  Even if you’ve used something like Autocad or Mastercam in the past, this program has it’s own set of funny conventions that make little sense.  I’m going to give you a short rundown here of the steps I’m using to make my board.  My list will be incomplete and may not work for you but it’s meant to just be a general outline of the steps you need to go through to get a board made.  My friend James was kind enough to sit down with me for a couple hours and walk me through this program so my list here is made from memory and from notes I made during that short training from him.

  1. Open up Kicad and create a new project.  Give it a name and ignore the warnings.
  2. Now that you have the main window open, add your devices to the board.  The device tool near the top of the right-hand toolbar.  After you’ve selected the device tool, click somewhere with the cross-cursor.  Chose “by lib browser”, find your component and then hit the “x” to close that dialog.  The cursor turns into the component.  Now click somewhere to place it.
  3. After you’ve placed it, you can change the placement and orientation by putting your mouse over it and pushing “r” to rotate or “m” to move it.
  4. After you’ve placed your components, push the “add wire” button below the device button.  Draw in all your wires and make sure you don’t have any goofy junctions.  Save your drawing!
  5. Now hit “Netlist generation”.  It’s in the top menu near the right-hand side.  Hit netlist, generate it and save it.
  6. Right click on every component you placed and annotate it.  Stuff like IC1, IC2, C1-C10, R1, etc.  Giving the parts values is not a bad idea either.  It may help later or if someone else needs to modify or view your drawing.  There is an auto-annotate function but it’s not my preference.  Save again.
  7. In the top menu, push the “Run CVpcb” button.  It’s orange and near the middle.  In this dialog, you need to associate every component with a package type.  This can be challenging if the type of package you need doesn’t exist as a default.  Save that before exiting.
  8. Run PCBnew, ignore the warning.  Check the measurement units on the left side.  Pick inches or mm.  Turn on the rat’s nest below the measurement tool if it isn’t on already.  Click “read netlist” on the top of the screen near the middle.  Click “read current”.  Now your parts are stacked in a blob in the corner.  Draw a box around them with the pointer and move them towards the middle of the sheet.  Click “ok” on the dialog.
  9. Zoom in and mouse over the blob of components.  Hit “m” and move components off the stack one by one.  As you move them, hit the “r” button to rotate them into place.
  10. Route your tracks.  Right click to end.
  11. Select the PCB edges layer and draw your PCB.  This can also be the first thing you do.
  12. You should now have a printable board.  I’ll report back when I do but it could be a while.

I realize this list may have small discrepancies or may be flat out wrong.  There are several tutorials online that explain it better than I do but mine is just to give you a really quick overview of what it will take to actually draw a board with this tool.  Please email me or comment if you see any glaring errors.  I will be on my way now to rip my hair out after using this incredibly complex and confusing piece of software.

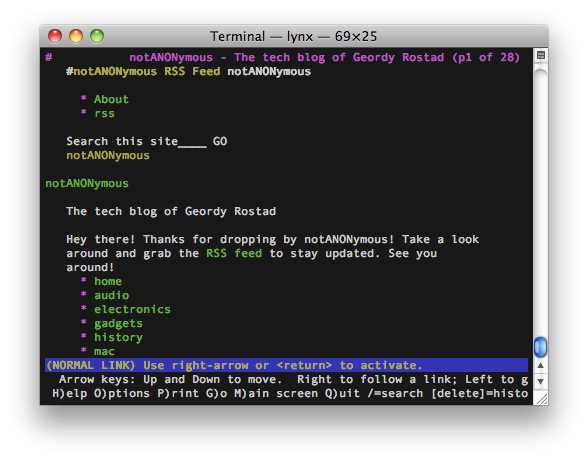
Lynx text-based web browser. It's not as complicated as it looks.

So you’ve installed Macports now and probably met your needs for the moment.  Did you ever wonder what else was available as a port?  Here is a short list of some other gems:

John the ripper – This is a password cracker.  It’s highly flexible.  Very handy for testing the strength of your own passwords or recovering a password in certain instances.  For instance, I’ve used it when administrating a web server when I have forgotten the password to a protected directory but I still have ssh or ftp access.  I’ll just grab the .htpasswd file and run it through John the Ripper and presto, it will give me one or more passwords.  It’s also good as a sysadmin if you want to make sure people are using good passwords.  You can run it against the password file, see which user’s passwords are returned and notify them that they need to set something stronger.  The port package is simply called john.

wget – Wget is one of my favorite handy little command line utilities.  All it does is downloads something from the internet and saves it.  This can be an html page or any file available on the web.  I use it when I want to download a tarball into a specific directory.  Instead of thumbing through directory trees on firefox, I’ll just copy and paste the URL into a shell and wget it.  Then it’s exactly where I need it and ready to be untarred.  The port package is called wget.

lynx – If you’ve never used Lynx before, now may not be the time to start.  Lynx is a command line, text-based web browser.  Before the days of Mosaic and Internet Explorer 1.0, Lynx was the browser of choice for early users of the web.  Some folks even snobbed the newer browsers reasoning that pictures just messed up the overage web experience.  Lynx is useful for when you are ssh’ing into your machine remotely and need to grab/install a file off the web or just do something similar quickly.  It supports cookies and many other modern features surprising enough.  The port package is called lynx.

There are TONS of other good packages out there.  Some other honorable mentions are bzip2, hexedit, hping3, nmap & tcpdump.  Feel free to post in the comments whatever cool packages you have found available as a Macport.

TinyELF self-modifying programs

I’ve been delving further into the subject of self-modifying programs on the TinyELF.  Take the program that I showed you in the last posting on the subject for instance:

0000    3F    BN4       Wait for you to press I

0001     00                   3F branches to THIS address if you don’t press “I”, if you do press “I”, it skips to the next address

0002    6c     INP 4    Take whatever is in the IN 4 buffer and put it into the next location in memory, then executes it

0003    00    IDL       It actually doesn’t matter WHAT you put in this spot since the 6C command will change it anyways

0004    00    IDL       after it 6C changes the previous bit, stop (or not depending on what input you send to the program)

Key in the program and then run it.  Type in 6C and then “I”.  So the program fills the memory ENTIRELY with 6C commands.  This is because 6C takes anything sitting in the “In 4” buffer and sticks it in the next byte but that’s not all.  It also RUNS IT!  So when you put in 6C, it still sees 6C in the buffer and then replaces the next byte and then runs that byte which is now 6C, rinse and repeat many, many times.

Now that the memory is filled entirely with 6C’s, re-key the first part of the program:

0000    3F    BN4      Wait for you to press I

0001     00                  3F branches to THIS address if you don’t press “I”, if you do press “I”, it skips to the next address

0002    6c     INP 4    Take whatever is in the IN 4 buffer and put it into the next location in memory

Now type in something like C4 and hit “I”.  If you remember from my last post, C4 is a “no op” command which just tells the computer to skip that byte.   I’ll let you run this yourself to see the output but it’s rather interesting.  See if you can guess what will happen by logical reasoning.

So far, the only command I find that overwrites the program itself is when you enter 6C.  There may be other ways but I’m not an assembly language ninja quite yet.

More tinkering with the TinyELF emulator

I’ve been tinkering some more in chapter 3 of Tom Pittman’s Short Course in Programming.  I still think the book is excellent but some of the concepts are starting to become a bit confusing.  For instance, when you take input from the hex keypad via the 6C INP 4 command, the next byte after that one gets modified if your memory protect is not enabled.  It seems this could make input sanitization a difficult task.  It also can make programs run unpredictably if you get a byte or two misplaced.  Of course that is the pitfall with assembly language in the first place.  To explain what I mean, enter in this program:

0000    3F    BN 4      Wait for you to press I

0001     00                  3F branches to THIS address if you don’t press “I”, if you do press “I”, it skips to the next address

0002    6c     INP 4    Take whatever is in the IN 4 buffer and put it into the next location in memory

0003    00    IDL       It actually doesn’t matter WHAT you put in this spot since the 6C command will change it anyways

0004    00    IDL       after it 6C changes the previous bit, stop (or not depending on what input you send to the program)

Now run the program and type in 6C and press the “I”.  I hope you are watching the memory contents window now because that’s crazy.   Re-enter the program and experiment with some other values.

I have absorbed a few other interesting things too.  First one that I like is the C4 NOP command.  No op simply skips to the next byte.  This is good for when you delete a command from memory but you don’t have enough room for a 30 BR LOOP followed by an address byte.

Next thing I like is the 64 OUT 4 command.  That command outputs to the hex display whatever is in the byte following the command.  For instance:

0000     64       OUT 4      This outputs the next byte to the display

0001      FF                         This will be output to the display

0002      00      IDL            Idle until further instructed

There are also other output lines but as far as I can tell, they are attached to anything in the emulator.

TinyELF Emulator for Macintosh OS X

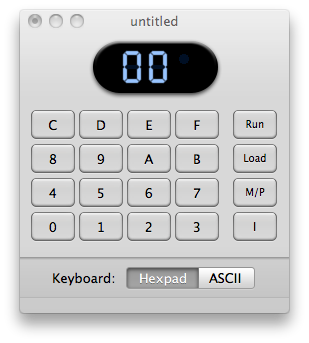
I’ve recently become serious about learning some assembly language.  I’ve always been interested in it but deemed it far too difficult of a task to take on.  It’s usually very mind boggling to look at and sometimes doesn’t make sense at a glance.  Recently I’ve come across a system to practice and learn it relatively easy.  It’s an emulator for OS X called tinyELF.  It’s based on a 1970’s hobbyist computer called the Cosmac ELF which is based on a RCA cpu called the 1802.  The unique thing about this chip is that it has a smallish intruction set of approximately 90 commands and you can enter byte code into it manually via a special loader mode.

The nice advantage of the emulator over the real computer of the 1970’s is that you can look at the memory contents, registers and a step-by-step trace of the instructions being executed.  Also, you can save programs and enter bytes manually into memory thus bypassing the loader.  Another huge advantage over the original Cosmac ELF is that this version features hexadecimal input.  The original elf featured toggle switches and required binary input.

To get started, I HIGHLY suggest reading this book that has been published online for free.  I’m into chapter 3 and so far it’s EXCELLENT.  It’s called A Short Course in Programming by Tom Pittman.  This would be better than me trying to re-explain how to enter programs although it’s much easier than it looks at first glance.

To give you a quick run down, when you start TinyELF, go to the debug menu and check off the Memory Contents, 1802 State and Trace.  These may look daunting at first but they will make sense in a minute.  Next, try out a sample program.  This program will make the R1 register count from 0000 to FFFF and keep rolling over.

0000   11     INC 1            This command increments register 1.

0001    30    BR LOOP    This command loops to the memory location specified in the next byte.

0002   00                          This is the target location for the BR LOOP command to branch off too.

I want to get you programming right away so I’ll tell you exactly what to press to input that program.  On the hex keypad press:

load, 11, I, 30, I, 00, I, Load

As you are doing that sequence, you should see the memory contents filling up.  You will need the 1802 State window open at the very least to see the output of this program.  When you have that window open, hit Run on the hex keypad. Register 2 should be counting up like nuts.  Congratulations, you just keyed in some old school assembly language.  This is very similar to what our forefathers did with punch cards but as I stated before, we have an advantage because we can very easily see the contents of the memory.

I encourage you to read that book that I linked to.  You will learn more than you can imagine about how computers work in a well-explained format.  If you don’t have a Mac, don’t worry, there are 1802 emulators out there for windows as well.  You’ll just have to do a little searching to find one.

How to convert decimal to binary back the easy way

decimal to binary

I’ve been reading a book on the CCNA certification.  Part of the exam has to do with being able to manually convert numbers between binary, decimal and hex.  I’ve struggled with that concept of being able to do it on paper an easy way but in this particular book, the author spelled out a very simple way to do this that just clicked and will now stick with me for life.  Binary numbers are counted in powers of 2 relative to decimal numbers.  That is the most confusing thing that I want to say about the subject.  It should get easier from here on.

Typically binary numbers are represented in 8-bits or 1-byte.  This just means there are 8 digits.  These 8-bits can represent any decimal number between 0 and 255.  That’s it, any higher numbers and you have to add more bits to represent it.  Now for the fun part.  Draw a chart on a piece of paper like this:

128 64 32 16 8 4 2 1

If you look at the chart, you’ll notice a relation to the numbers.  Starting with 2, each number is double the number to the right of it.  If you can remember this chart, you are over half way there.  So now pretend you have a decimal number like 190 that you need to convert to binary.  To convert it, you need to find the numbers in the chart, starting from the left, that will add up to 190.  For starters, we know that 128 will fit in to 190 so let’s mark that one off with a one.

128 64 32 16 8 4 2 1
1

The next number, 64 won’t fit.  That would add up to 192 so we’ll mark that one with a zero.

128 64 32 16 8 4 2 1
1 0

Think of it like playing blackjack.  You want to get to 21 but you never want to go over.  So keep adding numbers left to right until you reach the correct number, if you go over, skip that number.  Adding 32 brings us to 160, add 16 and that gives us 176.  We’re still not over so keep going.

128 64 32 16 8 4 2 1
1 0 1 1

Adding 8 brings us to 184, 4 more gives us 188.  2 more gives us 190 and we’re done so zero out the last bit.

128 64 32 16 8 4 2 1
1 0 1 1 1 1 1 0

So there you have it.  190 in decimal works out to 10111110 in binary.  With a little practice, you can easily do these in your head.  As you can see from the chart, it’s even easier to go backwards.  Just add up the numbers that are set to one and skip the ones that are set to zero.  Now for the bonus round!

binary to hexadecimal

Hex is something that a lot of people find confusing.  I still find it confusing to convert decimal to hex and vice versa but I have found that it’s VERY easy to convert from binary to hex and back.  Let’s take the same number we were just working with.  190 or 10111110.  To do hex, we have to split the one byte into two nibbles.  This is easier than it sounds.  We just split the chart into two halves but write the binary number straight across as if nothing has changed.  This is because each hex number can only represent “0” through “15” or more accurately “0” through “F”.  The chart looks like this now:

8 4 2 1 8 4 2 1
1 0 1 1 1 1 1 0

So now all you do is add up each nibble separately.  The first one on the left gives us 11 or “B”.  The second nibble adds up to 14 or “E”.  So 190 in decimal equals 10111110 in binary which equals “BE” in hexadecimal.  Personally I find it easier to convert decimal to binary before trying to convert it to hex but your mind may work differently.

A fun bit of history that Google hasn’t forgotten

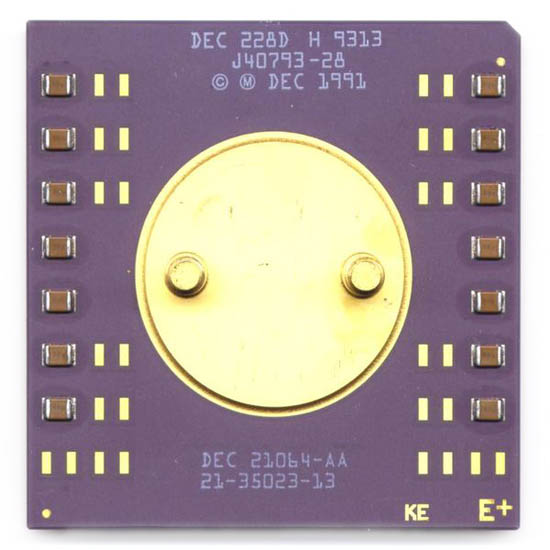
DEC Alpha CPU from the early 1990's

I was googling my own name today and found something interesting a few pages into the serp.  It was a little reminder that old data never dies.  In 1998 my second job in tech was building DEC(Digital Equipment Corporation) Alpha clones.  We could build the clones for FAR less than DEC sold them for and DEC still made money since they sold us the motherboards with a CPU for $5,000.

In those days, I used to come up with creative ways to burn the systems in.  I was installing Windows NT(alpha), DEC Unix & Redhat Linux.  None of these were binary compatible with anything x386.  These were 600Mhz, 64-bit risc architecture machines at a time where a Pentium Pro 150Mhz was a FAST desktop machine.  Since I didn’t have a proper burn-in suite, I would use distributed applications to crunch tons of data in hopes of at least running the processor through it’s paces a bit even if not the hard drive and other components.  Seti was among my favorites but sometimes I “donated” cycles to some other projects.  The Certicom ECC cracking challenge was one such project.  At the time, I didn’t really realize the significance of what I was doing.  If you look at the lists of people, there were only 40-80(or so) people who donated cpu cycles to each of these challenges.

I was just a young guy looking for precompiled binaries to test the somewhat rare systems I was building since I didn’t know how to compile code on those systems at the time.  Little did I know my name would be immortalized on the web as part of this project wielding some of the fastest single processor computers of the era. Check out the page here.  It’s really kind of fun to read about how one of the people running the project was crunching data packets on his ARM2 8Mhz machines.

This is a nifty trick you can use to impress your friends.  Imagine you have some smallish program that you want to wrap up into a single file for simplicity.  Part of final output perhaps relies on a clever bit of shell scripting and another part relies on a binary of some sort that you need to get the job done.  Here’s a way to wrap it all up in a tidy little package:

#!/bin/sh
grep SRC: $0 | grep -v “grep SRC:” | sed -e s/SRC://g > /tmp/hello.c
gcc -o hello /tmp/hello.c
./hello
exit
SRC: #include <stdio.h>
SRC: int main(int argc, char *argv[])
SRC: {
SRC: printf(“Hello World\n”);
SRC: return 0;
SRC: }

Everything below exit is completely ignored by your shell.  The grep statement goes through the shell script line by line and returns the all the lines starting with “SRC: ” to sed.  Sed uses a simple regex to strip the “SRC: ” off your source code and sends the output to a file in your /tmp directory.  Then the file is compiled and ran.  You could go further and delete the source file out of the /tmp directory if you like or don’t bother.

My last article is nice for checking for a few dependencies in a shell script but if your user has to keep running your script and then go back and install something and run it again, this can get very tiresome.  It’s much nicer to give your user a big list of deps they need to install in one shot.  Here is some code to do just that.

failed_dep=0
if ! which pkg1 > /dev/null; then
echo “Please install pkg1 or make sure it is in your path”
failed_dep=1
fi
if ! which pkg2 > /dev/null; then
echo “Please install pkg2 or make sure it is in your path”
failed_dep=1
fi
if ! which pkg3 > /dev/null; then
echo “Please install pkg3 or make sure it is in your path”
failed_dep=1
fi
if ! failed_dep==1; then
exit
fi

Obviously remember to change the “which pkg” to the dependency you are looking for and change the echo statement to reflect this as well.  Just keep adding if blocks if you need to check for more than three packages.  If you have a LOT of dependencies, your end user will thank you for using this method.

How to get a root shell in Ubuntu

When you install Ubuntu, it doesn’t give you the option of creating a root account.  Only a user.  Ubuntu is more desktop oriented so it pretends to not actually have a root account.  This only works so long as you don’t legitimately need it for something.  If you do, there is a simple trick to get a root shell.

Pop open a terminal window and type:

sudo passwd

You will be prompted for your current account’s password.  Next you will be prompted to set the root password and confirm it.  Now type:

su

You should be prompted for the password you just created and then you will be handed a root shell for your efforts.

Powered by WordPress. Theme: Motion by 85ideas.