Tag Archive: TinyELF


I’ve been tinkering some more in chapter 3 of Tom Pittman’s Short Course in Programming.  I still think the book is excellent but some of the concepts are starting to become a bit confusing.  For instance, when you take input from the hex keypad via the 6C INP 4 command, the next byte after that one gets modified if your memory protect is not enabled.  It seems this could make input sanitization a difficult task.  It also can make programs run unpredictably if you get a byte or two misplaced.  Of course that is the pitfall with assembly language in the first place.  To explain what I mean, enter in this program:

0000    3F    BN 4      Wait for you to press I

0001     00                  3F branches to THIS address if you don’t press “I”, if you do press “I”, it skips to the next address

0002    6c     INP 4    Take whatever is in the IN 4 buffer and put it into the next location in memory

0003    00    IDL       It actually doesn’t matter WHAT you put in this spot since the 6C command will change it anyways

0004    00    IDL       after it 6C changes the previous bit, stop (or not depending on what input you send to the program)

Now run the program and type in 6C and press the “I”.  I hope you are watching the memory contents window now because that’s crazy.   Re-enter the program and experiment with some other values.

I have absorbed a few other interesting things too.  First one that I like is the C4 NOP command.  No op simply skips to the next byte.  This is good for when you delete a command from memory but you don’t have enough room for a 30 BR LOOP followed by an address byte.

Next thing I like is the 64 OUT 4 command.  That command outputs to the hex display whatever is in the byte following the command.  For instance:

0000     64       OUT 4      This outputs the next byte to the display

0001      FF                         This will be output to the display

0002      00      IDL            Idle until further instructed

There are also other output lines but as far as I can tell, they are attached to anything in the emulator.

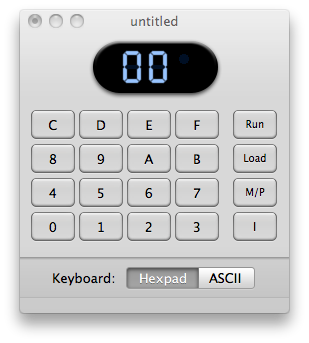
TinyELF Emulator for Macintosh OS X

I’ve recently become serious about learning some assembly language.  I’ve always been interested in it but deemed it far too difficult of a task to take on.  It’s usually very mind boggling to look at and sometimes doesn’t make sense at a glance.  Recently I’ve come across a system to practice and learn it relatively easy.  It’s an emulator for OS X called tinyELF.  It’s based on a 1970’s hobbyist computer called the Cosmac ELF which is based on a RCA cpu called the 1802.  The unique thing about this chip is that it has a smallish intruction set of approximately 90 commands and you can enter byte code into it manually via a special loader mode.

The nice advantage of the emulator over the real computer of the 1970’s is that you can look at the memory contents, registers and a step-by-step trace of the instructions being executed.  Also, you can save programs and enter bytes manually into memory thus bypassing the loader.  Another huge advantage over the original Cosmac ELF is that this version features hexadecimal input.  The original elf featured toggle switches and required binary input.

To get started, I HIGHLY suggest reading this book that has been published online for free.  I’m into chapter 3 and so far it’s EXCELLENT.  It’s called A Short Course in Programming by Tom Pittman.  This would be better than me trying to re-explain how to enter programs although it’s much easier than it looks at first glance.

To give you a quick run down, when you start TinyELF, go to the debug menu and check off the Memory Contents, 1802 State and Trace.  These may look daunting at first but they will make sense in a minute.  Next, try out a sample program.  This program will make the R1 register count from 0000 to FFFF and keep rolling over.

0000   11     INC 1            This command increments register 1.

0001    30    BR LOOP    This command loops to the memory location specified in the next byte.

0002   00                          This is the target location for the BR LOOP command to branch off too.

I want to get you programming right away so I’ll tell you exactly what to press to input that program.  On the hex keypad press:

load, 11, I, 30, I, 00, I, Load

As you are doing that sequence, you should see the memory contents filling up.  You will need the 1802 State window open at the very least to see the output of this program.  When you have that window open, hit Run on the hex keypad. Register 2 should be counting up like nuts.  Congratulations, you just keyed in some old school assembly language.  This is very similar to what our forefathers did with punch cards but as I stated before, we have an advantage because we can very easily see the contents of the memory.

I encourage you to read that book that I linked to.  You will learn more than you can imagine about how computers work in a well-explained format.  If you don’t have a Mac, don’t worry, there are 1802 emulators out there for windows as well.  You’ll just have to do a little searching to find one.

Powered by WordPress. Theme: Motion by 85ideas.